Reading Time: 5 minutes
Starting a fitness routine can feel overwhelming.
You look at workout videos online and see people doing burpees, jumping lunges, and complicated moves that require coordination you just do not have yet.
Here is the truth that fitness influencers do not tell you: You do not need to start there.
Every fit person you admire started exactly where you are right now—unsure, maybe a little uncomfortable, but willing to try.
This workout is for the absolute beginner. The person who has not exercised in months (or years). The person who wants to feel stronger, more capable, and more confident in her own body.
6 exercises. 15-20 minutes. No equipment. Your living room floor.
That is it. That is where transformation begins.
Part 1: The “Before You Start” Checklist
| Rule | Why It Matters |
|---|---|
| Listen to your body | “Good sore” (muscle fatigue) is fine. Sharp pain means stop. |
| Form over speed | Doing 5 perfect reps is better than 15 sloppy ones. |
| Breathe | Exhale on the hard part. Inhale on the easy part. |
| Rest when you need to | Take extra rest between exercises. No one is timing you. |
| Consistency beats intensity | 15 minutes today is better than 0 minutes. |
Part 2: The Warm-Up (3-5 Minutes)
Do not skip this. A warm-up wakes up your muscles and prevents injury.
| Time | Exercise | Instructions |
|---|---|---|
| 0:00-0:30 | March in place | Lift knees to waist height, swing arms |
| 0:30-1:00 | Arm circles | 15 seconds small, 15 seconds large (each direction) |
| 1:00-1:30 | Torso twists | Feet planted, swing arms side to side |
| 1:30-2:00 | Leg swings (forward/back) | Hold a wall, swing one leg gently |
| 2:00-2:30 | Leg swings (side to side) | Swing leg across body and out to side |
| 2:30-3:00 | Bodyweight squats | 10 slow squats, just to parallel |
Part 3: The 6 Beginner Full Body Exercises
Format: 30 seconds of work / 30 seconds of rest (or as needed)
Total: 6 exercises, 2-3 rounds = 15-20 minutes
Exercise 1: Wall Push-Ups
Targets: Chest, shoulders, triceps, core
Why start here: Traditional push-ups are too hard for most beginners. Wall push-ups let you build strength safely.
How to do it:
Stand facing a wall, about arm’s length away
Place your hands on the wall at shoulder height, slightly wider than shoulder-width apart
Walk your feet back a few inches so your body is at a slight angle
Bend your elbows and lower your chest toward the wall
Push back to starting position
Make it easier: Stand closer to the wall.
Make it harder: Walk your feet further back (more horizontal).
Pro tip: Keep your body in a straight line from head to heels. Do not let your hips sag.
Exercise 2: Bodyweight Squats
Targets: Quads, hamstrings, glutes, core
Why this is essential: Squats are the foundation of lower body strength. They work your largest muscles, which boosts metabolism.
How to do it:
Stand with feet shoulder-width apart, toes slightly turned out
Extend your arms straight out in front of you for balance
Push your hips back like you are sitting into an invisible chair
Lower until your thighs are parallel to the ground (or as low as comfortable)
Press through your heels to stand back up
Make it easier: Squat to a chair (tap the seat, then stand up).
Make it harder: Slow down the lowering phase (3 seconds down, 1 second up).
Pro tip: Keep your chest up and your weight in your heels. If your knees cave inward, push them outward.
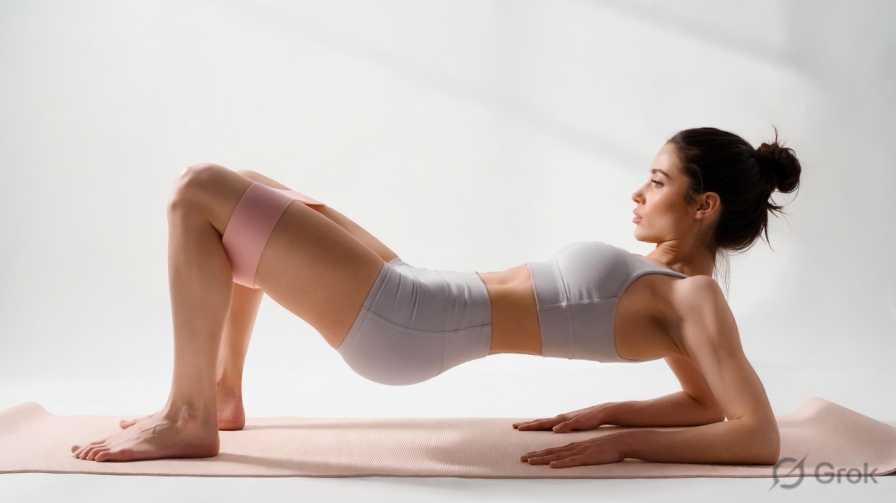
Exercise 3: Glute Bridges
Targets: Glutes, hamstrings, lower back, core
Why this is essential: Many women have “sleepy glutes” from sitting all day. Glute bridges wake them up and help lift and shape your backside.
How to do it:
Lie on your back with knees bent, feet flat on the floor (hip-width apart)
Arms rest at your sides, palms down
Squeeze your glutes and lift your hips toward the ceiling
Hold for 1 second at the top
Lower back down with control
Make it easier: Smaller range of motion (just lift a few inches).
Make it harder: Single-leg glute bridge (extend one leg straight, lift with the other).
Pro tip: Do not let your lower back do the work. The lift comes from squeezing your glutes, not arching your spine.
Exercise 4: Bird-Dog
Targets: Entire core, lower back, glutes, shoulders
Why this is essential: This move teaches your core to stabilize while your limbs move. It is excellent for back pain prevention and posture.
How to do it:
Start on your hands and knees (hands under shoulders, knees under hips)
Engage your core (imagine zipping up a tight pair of jeans)
Extend your right arm straight forward and your left leg straight back
Hold for 2 seconds, keeping your hips square to the floor
Return to start and switch sides (left arm + right leg)
Make it easier: Extend only your arm, then only your leg.
Make it harder: Hold the extended position for 5-10 seconds.
Pro tip: Imagine balancing a glass of water on your lower back. Do not let it spill.
Exercise 5: Reverse Lunges
Targets: Glutes, hamstrings, quads, core
Why reverse lunges are better for beginners: Forward lunges put stress on your knees. Reverse lunges are gentler and easier to balance.
How to do it:
Stand with feet hip-width apart
Step your right foot back into a deep lunge (both knees at 90 degrees)
Your front knee should be directly above your ankle (not past it)
Push through your left heel to return to standing
Repeat on the same side for all reps, then switch legs
Make it easier: Hold onto a wall or chair for balance. Take smaller steps back.
Make it harder: Add a knee drive (bring your back knee toward your chest as you stand).
Pro tip: Keep your chest up and your torso upright. Do not lean forward.
Exercise 6: Dead Bug (Modified)
Targets: Deep core (transverse abdominis), lower abs
Why this is essential: Traditional crunches can hurt your neck and back. Dead bugs are safer and more effective for building a flat stomach.
How to do it:
Lie on your back with arms extended toward the ceiling (perpendicular to floor)
Lift your legs so your knees are at 90 degrees (shins parallel to floor)
Press your lower back into the floor (this is crucial)
Slowly lower your right arm and left leg toward the floor (do not let them touch)
Return to center, then switch sides (left arm + right leg)
Make it easier: Keep both knees bent and lower only one leg at a time.
Make it harder: Add a 2-second hold at the bottom.
Pro tip: If your lower back arches off the floor, you are lowering too far. Shorten the range of motion.
Part 4: The Complete Beginner Workout (At a Glance)
Round 1 (6 minutes)
| Time | Exercise | Work | Rest |
|---|---|---|---|
| 0:00-0:30 | Wall Push-Ups | 30 sec | 30 sec |
| 0:30-1:00 | Bodyweight Squats | 30 sec | 30 sec |
| 1:00-1:30 | Glute Bridges | 30 sec | 30 sec |
| 1:30-2:00 | Bird-Dog | 30 sec | 30 sec |
| 2:00-2:30 | Reverse Lunges (right leg) | 30 sec | 30 sec |
| 2:30-3:00 | Reverse Lunges (left leg) | 30 sec | 30 sec |
| 3:00-3:30 | Dead Bug | 30 sec | 30 sec |
Rest 60 seconds.
Round 2 (repeat)
| Time | Exercise | Work | Rest |
|---|---|---|---|
| 4:30-5:00 | Wall Push-Ups | 30 sec | 30 sec |
| 5:00-5:30 | Bodyweight Squats | 30 sec | 30 sec |
| 5:30-6:00 | Glute Bridges | 30 sec | 30 sec |
| 6:00-6:30 | Bird-Dog | 30 sec | 30 sec |
| 6:30-7:00 | Reverse Lunges (right leg) | 30 sec | 30 sec |
| 7:00-7:30 | Reverse Lunges (left leg) | 30 sec | 30 sec |
| 7:30-8:00 | Dead Bug | 30 sec | 30 sec |
Rest 60 seconds. Add a third round if you feel ready.
Part 5: The Cool-Down (2-3 Minutes)
| Time | Stretch | Instructions |
|---|---|---|
| 0:00-0:30 | Quad stretch | Stand, grab right foot behind you, pull toward glutes. Switch at 0:15. |
| 0:30-1:00 | Hamstring stretch | Extend right leg forward, heel on floor, toe up. Lean forward. Switch at 0:45. |
| 1:00-1:30 | Chest stretch | Clasp hands behind back, open chest, lift arms. |
| 1:30-2:00 | Cat-Cow | On hands and knees, alternate arching back (cow) and rounding spine (cat). |
| 2:00-2:30 | Deep breathing | Lie on back, hands on belly. Breathe deeply for 30 seconds. |
Part 6: The 4-Week Beginner Plan
| Week | Workouts per Week | Focus | Round Progression |
|---|---|---|---|
| Week 1 | 2 | Learn the moves. Focus on form. | 2 rounds |
| Week 2 | 2-3 | Smooth transitions. Less rest between exercises. | 2 rounds |
| Week 3 | 3 | Increase intensity. Deeper squats. Slower push-ups. | 2 rounds (add 3rd round if ready) |
| Week 4 | 3 | Challenge yourself. Add a 3rd round. | 3 rounds |
Part 7: Signs You Are Getting Stronger
| Sign | What It Means |
|---|---|
| You can hold the plank longer than last week | Your core is stronger |
| Squats feel deeper and more controlled | Your legs are gaining strength |
| You are not out of breath between exercises | Your cardiovascular fitness is improving |
| You feel “good sore” the next day (not sharp pain) | Your muscles are adapting and growing |
| You can complete all reps without stopping | Your endurance is building |
Celebrate every single one of these.
Part 8: Frequently Asked Questions
Q: I am very out of shape. Can I still do this?
A: Yes. That is exactly who this workout is for. Take extra rest. Do fewer reps. Skip an exercise if it hurts. Start where you are.
Q: What if I cannot do 30 seconds of an exercise?
A: Do 15 seconds. Rest 15 seconds. Then try again. Or do as many reps as you can with good form, then rest.
Q: How long until I see results?
A: You may feel stronger in 2-3 weeks. You may see visible changes (more tone, better posture) in 4-6 weeks of consistent training.
Q: Can I lose weight with this workout?
A: This workout builds muscle and burns calories. For weight loss, combine it with a calorie deficit (eating slightly less than you burn). The *30-Day Fat Burning Challenge* is a great place to start.
Q: I have bad knees. What should I modify?
A: Skip the reverse lunges. Do more squats (shallow) and glute bridges instead. For squats, use a chair and sit/stand.
Q: I have wrist pain. What should I do?
A: Do push-ups on your fists or knuckles. For bird-dog, come down to your forearms instead of hands.
The Bottom Line
You do not need to be fit to start.
You need to start to become fit.
These 6 exercises are not fancy. They are not Instagram-worthy. They are the foundational movements that every strong woman learned first.
Wall push-ups
Bodyweight squats
Glute bridges
Bird-dog
Reverse lunges
Dead bug
Six exercises. Fifteen minutes. Three times per week.
That is the start of your transformation.
Your assignment today:
Stand up right now
Do 5 wall push-ups
Do 5 bodyweight squats
Take a deep breath
Tell yourself: “I can do this. I am doing this.”
Then come back tomorrow and do the full workout.
Your stronger, more capable body is waiting for you.
Save this post. Share it with a friend who says “I just cannot get started.” She needs this workout.
Want a free printable beginner workout tracker (4 weeks, with checkboxes for each exercise)? Drop a comment or message me. I will send it to you.
And if you are ready for more: After 4 weeks, try the *20-Minute Summer Body Workout* or the *10-Minute Lower Abs Workout for Beginners*. Links below.