Reading Time: 5 minutes
Let me tell you something that might surprise you.
That “pooch” below your belly button? The area that feels impossible to tone? The part of your stomach that no crunch seems to reach?
It is not because you are not working hard enough.
Most ab workouts miss the lower abs completely. They target the upper rectus abdominis (the “six-pack” area) while ignoring the deep transverse abdominis and lower fibers that create that flat, toned look.
But here is the other truth: Lower ab exercises can hurt your back if you do them wrong.
That is why this 10-Minute Lower Abs Workout for Beginners is different. Every single move is designed to:
Target the lower belly specifically
Protect your lower back (no straining)
Strengthen your deep core (the internal “corset” that flattens your stomach)
Require no equipment and very little space
No crunches that hurt your neck. No leg lifts that strain your back. Just safe, effective moves that actually work.
Let me show you how.
Part 1: Why Most People Never See Lower Ab Results
Before the workout, understand the problem.
| Problem | Why It Happens | The Fix |
|---|---|---|
| Lower abs are hard to engage | The lower fibers have fewer nerve connections than upper abs | Use specific, targeted movements |
| Traditional crunches miss them | Crunches target the upper abs almost exclusively | Skip crunches entirely |
| Leg lifts hurt your back | When your lower back arches off the floor, you strain your spine | Keep lower back pressed into the floor at all times |
| You cannot spot-reduce fat | Doing 1,000 ab exercises will not burn belly fat alone | Combine this workout with overall fat loss |
The bottom line: You need the right exercises and overall fat loss. This workout builds the muscle. Your nutrition burns the fat covering it.
Part 2: The 5 Golden Rules for Lower Abs (Read First)
| Rule | Why It Matters |
|---|---|
| 1. Press your lower back into the floor | If you can slide a hand under your lower back, you are straining it. Keep it flat. |
| 2. Move slowly | Rushing uses momentum instead of muscle. Slow = effective. |
| 3. Exhale on the effort | Breathe out when you contract your abs. This engages the deep core. |
| 4. Quality over quantity | 5 perfect reps are better than 20 sloppy ones. |
| 5. Do not feel it in your back | If your back hurts, stop. You are arching. Flatten your back and try again. |
Pro tip: Before starting, lie on your back and find your “neutral spine.” Press your lower back into the floor. That is your starting position for every exercise.
Part 3: The Warm-Up (2 Minutes)
| Time | Exercise | Instructions |
|---|---|---|
| 0:00-0:30 | Cat-Cow stretch | On hands and knees, alternate arching back (cow) and rounding spine (cat) |
| 0:30-1:00 | Pelvic tilts | Lying on back, flatten lower back into floor, then release. Repeat. |
| 1:00-1:30 | Deep breathing | Lying on back, hands on belly. Inhale (belly rises), exhale (belly falls). |
| 1:30-2:00 | Dead bug prep | Lying on back, arms up, knees at 90 degrees. Tap right heel, return. Alternate. |
Part 4: The 10-Minute Lower Abs Workout
Format: 40 seconds of work / 20 seconds of rest
Total: 10 minutes (10 exercises, 1 round each)
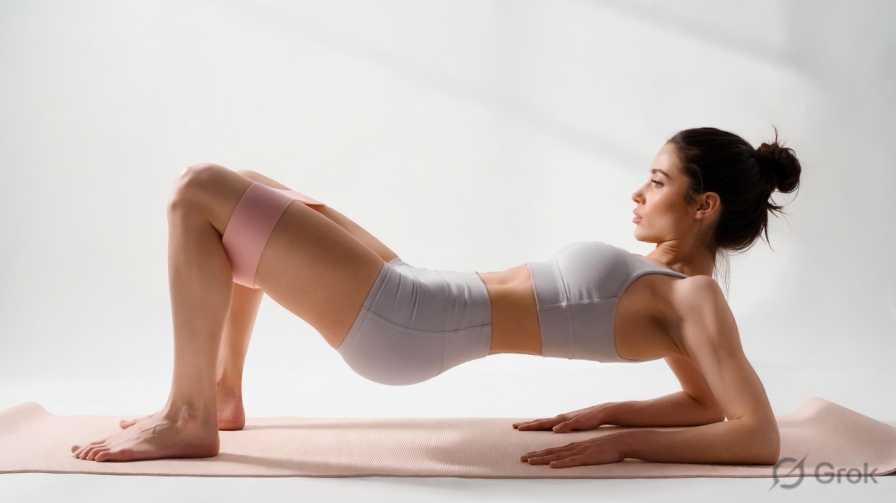
Exercise 1: Pelvic Tilts (The “Lower Back Reset”)
Target: Deep core activation, lower back protection
Why first: This move teaches you how to engage your lower abs without straining your back. Master this before moving on.
How to do it:
Lie on your back with knees bent, feet flat on the floor
Place your hands under your lower back (palms down)
Gently press your lower back into your hands (flattening the arch)
Hold for 2 seconds, then release slightly (do not fully arch)
Repeat the press-and-release motion
Common mistake: Holding your breath. Exhale as you press your back down.
Pro tip: Your lower back should stay in contact with the floor during every exercise that follows. This is your foundation.
Exercise 2: Heel Slides
Target: Lower rectus abdominis (the “pooch” area)
How to do it:
Lie on your back with knees bent, feet flat, lower back pressed into the floor
Slowly slide your right heel away from your body, straightening your leg
Slide it back to starting position
Alternate legs
Key form cue: Keep your lower back flat. If it arches, you have slid your leg too far. Shorten the slide.
Pro tip: Imagine you are sliding your heel along a sticky floor. The resistance keeps your abs engaged.
Exercise 3: Dead Bugs (Modified)
Target: Transverse abdominis (deep core “corset”)
How to do it:
Lie on your back with arms extended toward the ceiling, knees bent at 90 degrees (shins parallel to floor)
Press lower back into the floor
Slowly lower your right arm and left leg toward the floor (do not let them touch)
Return to center
Alternate sides (left arm + right leg)
Key form cue: Go slow. If your back arches, you are lowering too far. Shorten the range of motion.
Pro tip: Imagine you are balancing a glass of water on your lower belly. Do not spill it.
Exercise 4: Flutter Kicks (Beginner Version)
Target: Lower abs, hip flexors
How to do it:
Lie on your back with hands under your hips (palms down)
Press lower back into your hands
Lift both legs a few inches off the floor
Scissor your legs up and down in small, controlled movements
Key form cue: Keep your movements small. Big kicks engage your hip flexors, not your abs. Small flutters target the lower belly.
Modification: Keep one foot on the floor and flutter the other leg only. Switch halfway.
Pro tip: If your back arches, your legs are too low. Lift them slightly higher until your back stays flat.
Exercise 5: Reverse Crunches (Gentle)
Target: Lower rectus abdominis (the “pooch”)
How to do it:
Lie on your back with knees bent, feet flat, hands by your sides (palms down)
Press lower back into the floor
Gently lift your feet off the floor so your knees are at 90 degrees (shins parallel)
Keeping your knees at 90 degrees, curl your hips a few inches off the floor (do not use momentum)
Slowly lower back down
Key form cue: This is a small movement—just a few inches. If you are swinging your legs, you are using momentum, not abs.
Modification: Keep one foot on the floor and reverse crunch with one leg only. Switch sides.
Pro tip: Exhale as you curl your hips up. Inhale as you lower.
Exercise 6: Scissor Kicks
Target: Lower abs, inner thighs
How to do it:
Lie on your back with hands under your hips
Press lower back into the floor
Lift both legs a few inches off the floor
Cross your right leg over your left (like scissors)
Uncross and cross your left leg over your right
Continue alternating
Key form cue: Keep your legs straight but not locked. Do not let your back arch.
Modification: Keep knees slightly bent. Straighten as you get stronger.
Pro tip: Imagine you are cutting a piece of paper with your legs. Slow, controlled, precise.
Exercise 7: Heel Taps
Target: Lower abs, obliques (side waist)
How to do it:
Lie on your back with knees bent, feet flat, shoulder-width apart
Press lower back into the floor
Crunch your shoulders slightly off the floor (keep chin off chest)
Reach your right hand toward your right heel (tap it)
Return to center
Reach your left hand toward your left heel
Continue alternating
Key form cue: This is a small movement. You are not doing full sit-ups. Just a slight curl.
Pro tip: Keep your lower back pressed into the floor the entire time. If it lifts, you are reaching too far.
Exercise 8: Leg Lowering (The “Hardest” Move)
Target: Lower abs (this is the advanced beginner move)
How to do it:
Lie on your back with hands under your hips
Press lower back into the floor
Lift both legs to a tabletop position (knees at 90 degrees, shins parallel)
Slowly lower your right leg toward the floor (do not let it touch)
Return to tabletop
Slowly lower your left leg
Continue alternating
Key form cue: If your back arches, you are lowering your leg too far. Shorten the range of motion.
Modification: Keep both knees bent and lower both feet together (like a reverse crunch). This is easier.
Pro tip: This move looks easy but is deceptively hard. Go slow. Quality over quantity.
Exercise 9: Plank (Knee Option)
Target: Entire core (including lower abs)
How to do it:
Start on your hands and knees (hands under shoulders)
Step your knees back so your body forms a straight line from head to knees
Squeeze your glutes and engage your core
Hold for 40 seconds
Key form cue: Do not let your hips sag toward the floor. Do not pike your hips up toward the ceiling. Your body should be a straight line.
Modification: Full plank on toes if you are ready. Or start with a wall plank.
Pro tip: Look at the floor about 6 inches in front of your hands. This keeps your neck in a neutral position.
Exercise 10: Vacuum Pose (The Deep Core Finisher)
Target: Transverse abdominis (deepest abdominal muscle)
Why last: This move is not about movement—it is about activation. It trains the muscle that acts like a natural corset, pulling your stomach inward.
How to do it:
Lie on your back with knees bent, feet flat, hands resting on your lower belly
Exhale all the air out of your lungs
Without inhaling, pull your belly button toward your spine (as if you are trying to zip up tight jeans)
Hold the contraction for 15-20 seconds
Inhale and release
Repeat twice more
Key form cue: You should feel your lower belly pulling inward and upward. Your hand should feel the muscle engage.
Pro tip: Do this move on an empty stomach (morning before breakfast is ideal). It is more effective when your stomach is not digesting food.
Part 5: The Complete 10-Minute Routine (At a Glance)
| Time | Exercise | Rest |
|---|---|---|
| 0:00-0:40 | Pelvic Tilts | 20 sec |
| 0:40-1:20 | Heel Slides | 20 sec |
| 1:20-2:00 | Dead Bugs (modified) | 20 sec |
| 2:00-2:40 | Flutter Kicks (beginner) | 20 sec |
| 2:40-3:20 | Reverse Crunches (gentle) | 20 sec |
| 3:20-4:00 | Scissor Kicks | 20 sec |
| 4:00-4:40 | Heel Taps | 20 sec |
| 4:40-5:20 | Leg Lowering (alternating) | 20 sec |
| 5:20-6:00 | Plank (knee option) | 20 sec |
| 6:00-6:40 | Vacuum Pose | Done |
That is 10 minutes. You are done.
Part 6: The “I Feel It in My Back” Troubleshooting Guide
| Symptom | Cause | Fix |
|---|---|---|
| Lower back arches off floor | Hip flexors are tight; you are compensating | Flatten back. Shorten range of motion. Place a towel under lower back. |
| Sharp pain in back | Incorrect form or existing injury | Stop immediately. See a doctor or physical therapist. |
| Neck pain during heel taps | You are pulling on your neck | Keep chin off chest. Support head with hands (do not pull). |
| Hip flexors burn more than abs | You are leading with your legs, not your core | Slow down. Focus on pressing lower back into floor. |
The rule: If you feel an exercise anywhere other than your abs, stop and check your form. Do not “push through” back pain.
Part 7: The 4-Week Progressive Plan
| Week | Workouts per Week | Focus |
|---|---|---|
| Week 1 | 3 | Learn the moves. Master the form. Do not worry about speed. |
| Week 2 | 3-4 | Increase intensity. Go deeper in leg lowers. Hold vacuum longer. |
| Week 3 | 4 | Add a second round (20 minutes total). Rest 60 seconds between rounds. |
| Week 4 | 4 | Maintain. Focus on quality. Add light ankle weights (1-2 lbs) if ready. |
Part 8: The Nutrition Connection (Because Abs Are Made in the Kitchen)
This workout builds strong lower abs. But you will not see them if they are covered by a layer of fat.
The 3 non-negotiable for visible abs:
| Rule | Why |
|---|---|
| Calorie deficit | You need to burn more than you eat. Otherwise, the muscle stays hidden. |
| Protein at every meal | Preserves muscle while losing fat. Aim for 0.7-1g per pound of body weight. |
| Whole foods | Processed foods cause inflammation and bloating, hiding your ab muscles. |
The good news: You do not need to be “skinny” to see ab definition. You just need to be lean enough that the muscle is visible. For most women, this is 20-25% body fat.
Part 9: When to Do This Workout
| Time of Day | Pros | Cons |
|---|---|---|
| Morning (fasted) | May tap into fat stores; sets tone for day | Some women feel weak without fuel |
| Before lunch | Good energy levels; not too full | Hard to fit into work schedule |
| After cardio | Abs are already warm; efficient | May be too tired for good form |
| Before bed | Can relieve tension; good habit | Late-day energy may be low |
Recommendation: Do this workout 3-4 times per week, preferably in the morning or before lunch when your energy is highest.
Frequently Asked Questions
Q: Can I do this workout every day?
A: Yes, but you do not need to. Abs recover quickly, but 3-4 times per week is enough for results. Rest days allow muscle repair and growth.
Q: Will this workout burn belly fat?
A: No exercise can “spot reduce” fat. This workout builds the muscle under your belly fat. To see the muscle, you need a calorie deficit (nutrition). The combination of both gives you visible results.
Q: I have diastasis recti (ab separation). Can I do this?
A: Some moves (reverse crunches, leg lowers) can worsen diastasis recti. Consult a pelvic floor physical therapist before starting. Safer moves: pelvic tilts, dead bugs, heel slides, vacuum pose.
Q: I am postpartum. When can I start?
A: Wait until your 6-week checkup (or longer for C-section). Start with pelvic tilts and deep breathing only. See a pelvic floor specialist before doing crunches or leg lifts.
Q: Why do I feel this in my hip flexors instead of my abs?
A: This is the most common complaint. Your hip flexors are tight and taking over. Solution: (1) Press lower back into floor. (2) Shorten your range of motion. (3) Stretch your hip flexors after workouts.
Q: How long until I see results?
A: You may feel stronger in 2-3 weeks. You may see visible changes in 4-6 weeks if you combine this workout with a calorie deficit.
The Bottom Line
Lower abs are not impossible to target.
You just need the right exercises—and the patience to do them correctly.
This 10-minute workout gives you:
Pelvic tilts (the lower back reset)
Heel slides (pooch targeter)
Dead bugs (deep core activator)
Flutter kicks (lower ab burner)
Reverse crunches (gentle and effective)
Scissor kicks (inner thighs + lower abs)
Heel taps (obliques + lower abs)
Leg lowering (advanced beginner)
Plank (full core)
Vacuum pose (the deep core finisher)
Ten exercises. Ten minutes. Three to four times per week.
That is it. That is the plan.
Your assignment today:
Lie down on your floor right now
Find your neutral spine (press lower back into floor)
Do 1 round of pelvic tilts
Decide if you have 10 more minutes
Your lower abs have been waiting for you to wake them up. Today is the day.
Save this post. Share it with a friend who has given up on her lower belly. She just needed the right workout.
Want a free printable 4-week lower abs workout calendar? Drop a comment or message me. I will send it to you.
And if you are ready for more: Pair this workout with the *20-Minute Summer Body Workout* and the *10-Minute Fat Burning Workout at Home* for complete transformation. Links below.