Introduction: Why glutes + outer thighs deserve a dedicated workout
Glute & Outer Thigh Workout at Home If you’ve ever finished a “leg day” feeling it mostly in your quads—or you’ve done endless squats without seeing much change in your side glutes—there’s a good chance you’re missing a key piece of lower-body training: hip abduction and glute medius activation.
The “outer thigh” area is often discussed like it’s one single muscle, but what most people are really trying to train for shape, stability, and that lifted side-glute look is a combination of:
- Glute medius (side glute; crucial for pelvic stability)
- Glute minimus (deep hip stabilizer)
- Hip abductors (muscles that move your leg away from your body’s midline)
These muscles are active when you walk, run, climb stairs, stand on one leg, or stabilize during squats and lunges. Training them directly can help you:
- Build rounder, stronger glutes (especially the “upper/side” glute)
- Improve hip and knee alignment (less knee cave-in)
- Enhance performance in squats, deadlifts, and single-leg work
- Feel more stable in everyday movement (walking, hiking, sport)
This blog gives you a 30-minute glute & outer thigh workout at home using a mini band—plus technique cues, beginner modifications, progressions, and a simple weekly plan.
What you need (equipment + setup)
You can do this session with minimal gear:
- Mini resistance band (light, medium, or heavy)
- Mat (optional, but helpful for floor work)
- Wall/chair (optional for balance during standing moves)
- Optional: ankle weights (only if you can keep perfect control)
Best band placement (and why it matters)
Band placement changes difficulty and which muscles feel the tension most:
- Above knees (around thighs): Most beginner-friendly. Easier to keep alignment and feel the side glutes without hip flexors taking over.
- Below knees: Slightly harder; still manageable if form is solid.
- Around ankles/feet: Hardest. Longer lever increases difficulty, but form can break easily (hips twist, lower back compensates). Use only once you’ve mastered control.
For most people, above the knees is the sweet spot to start.
Warm-up (5 minutes) to “wake up” your glutes
A mini band workout works best when your glutes are actually firing. If you sit a lot, your hip flexors can dominate and your glutes can feel “sleepy.” Use this short warm-up before the main session:
- Hip circles (hands on hips) – 30 seconds each direction
- Bodyweight good mornings – 10 slow reps (feel hamstrings + glutes)
- Glute bridges (no band) – 12 reps (pause 1 second at the top)
- Side-lying clamshells (no band) – 10 reps each side
- Air squats – 10 reps (knees track over toes)
Then put the band on for the main workout.
The #1 technique rule: keep constant tension
The magic of band training is continuous resistance. If you let the band go slack between reps, you lose much of the benefit.
Use these cues throughout the session:
- “Knees gently pressed out” (not flared aggressively, just constant outward tension)
- “Control the return” (slow eccentric = better results)
- “No rocking hips” (keep pelvis square, avoid twisting)
- “Ribs stacked over pelvis” (don’t arch lower back to chase range)
If you feel this mostly in the front of the hip (hip flexors), reduce range slightly, move slower, and consider moving the band above the knees.
30-minute Glute & Outer Thigh Workout at Home (Mini Band)
Format: 2 rounds × 10 exercises
Work/rest: 40 seconds work / 20 seconds rest
Total: ~20 minutes of work + rest + transitions
Add a 5-minute warm-up and a short finisher/cooldown to reach 30 minutes.
If you prefer, you can do 45/15 for more intensity or 30/30 for a gentler pace.
Round Structure
- Complete exercises 1–10 in order
- Rest 60–90 seconds
- Repeat for Round 2
- Finish with the finisher (optional but recommended)
Exercise 1: Banded Lateral Walk (Side Steps)
How: Slight bend in knees, hinge slightly at hips, step to the side without letting feet snap together.
Feel it: Side glutes (glute medius).
Form cues:
- Keep toes mostly forward
- Step wide enough to maintain tension
- Don’t sway torso side to side
Beginner option: Smaller steps, slower pace.
Harder option: Band lower (below knees).
Exercise 2: Monster Walk (Forward + Back)
How: Wide stance, step forward diagonally (like a “V”), then step the other foot forward to re-establish stance; repeat backward.
Feel it: Glutes + abductors, with a strong burn.
Form cues:
- Stay low and controlled
- No knee collapse inward
- Keep hips level
Exercise 3: Squat + Abduction Press-Out
How: Squat down, and as you stand, actively press knees outward against the band.
Feel it: Quads + glute max + glute med.
Form cues:
- Knees track over toes
- Weight mid-foot to heel
- Don’t arch lower back at the top
Beginner option: Reduce squat depth.
Harder option: Add a 1–2 second pause at the bottom.
Exercise 4: Wall-Supported Standing Hip Abduction (Right)
How: Hold wall/chair for balance, stand tall, lift right leg out to the side against the band.
Feel it: Right side glute.
Form cues:
- Keep hips square (don’t rotate outward)
- Small controlled lift beats high swinging
- Slow return—don’t let band snap back
Harder option: Add a 1-second hold at the top.
Exercise 5: Wall-Supported Standing Hip Abduction (Left)
Repeat on the left side with the same cues.
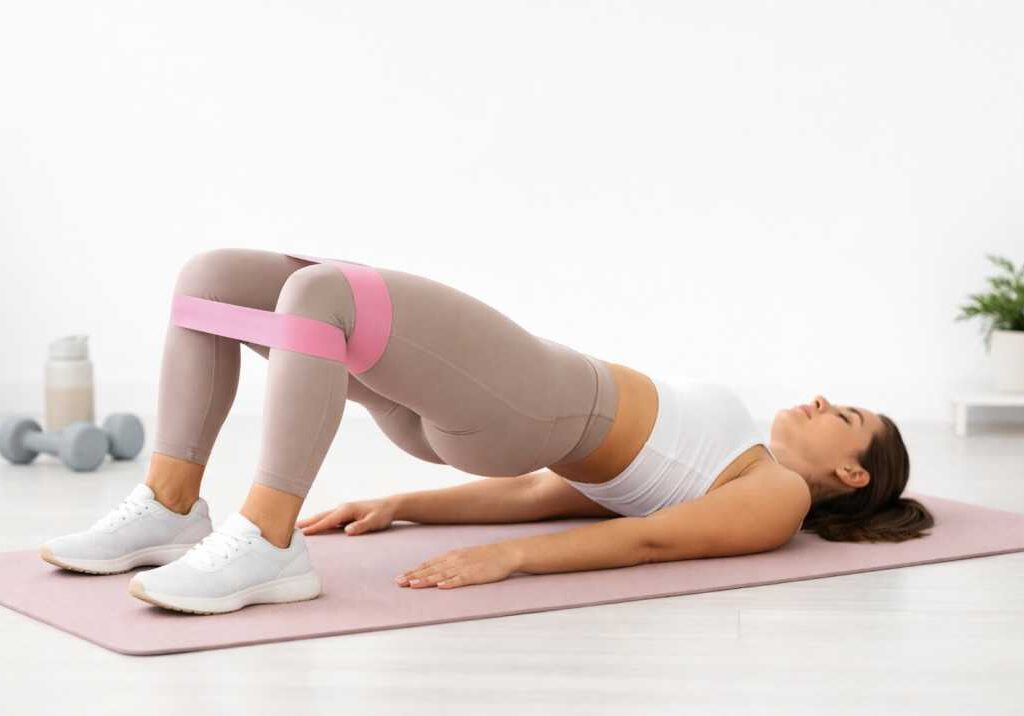
Exercise 6: Glute Bridge + Band Press
How: Lie on back, knees bent, band above knees. Bridge hips up and maintain tension pushing knees outward.
Feel it: Glute max with extra glute med activation.
Form cues:
- Tuck pelvis slightly (avoid over-arching)
- Push through heels
- Pause at top for 1 second
Harder option: Single-leg bridge (only if hips stay level).
Exercise 7: Frog Pumps (Banded)
How: Soles of feet together, knees out, band above knees. Pump hips up and down with small range.
Feel it: Glutes (burnout style).
Form cues:
- Keep constant knee-out pressure
- Short range is fine—focus on squeeze
- Neck relaxed, ribs down
Exercise 8: Side-Lying Clamshell (Right)
How: Lie on side, knees bent, feet together. Open top knee against band without rolling hips back.
Feel it: Glute med/min.
Form cues:
- Hips stacked
- Slow open, slower close
- Stop before you lose alignment
Harder option: Hold top position for 2 seconds.
Exercise 9: Side-Lying Clamshell (Left)
Repeat on the left side.
Exercise 10: Fire Hydrant (Quadruped)
How: On all fours, lift knee out to the side (like a dog at a fire hydrant).
Feel it: Side glute and deep hip stabilizers.
Form cues:
- Keep core braced
- Hips square to the floor
- Don’t twist torso to lift higher
Beginner option: Smaller range, slower tempo.
Harder option: Add a 1–2 second pause at the top.
Optional 5-minute Finisher (for maximum glute burn)
Do this after the 2 rounds:
Finisher block (repeat 2–3 times):
- 30 sec glute bridge hold (knees pressed outward)
- 30 sec abduction pulses at the top of the bridge
- 30 sec rest
This finisher is simple, brutal (in a good way), and very effective for glute engagement.
Cooldown (3–5 minutes) To reduce tightness and help recovery:
- Figure-4 glute stretch – 30–45 sec each side
- Hip flexor stretch – 30–45 sec each side
- Child’s pose with side reach – 30 sec each side
- Light walk around the room for 1 minute
Common mistakes (and quick fixes)
Mistake 1: Feeling it in hip flexors, not glutes
Fix: Move band above knees, slow down, keep ribs down, reduce range slightly.
Mistake 2: Knees cave in during squats/walks
Fix: Use a lighter band and focus on “push out gently” rather than fighting a band that’s too heavy.
Mistake 3: Using momentum
Fix: Add a “rule”: every rep has a 2-second return.
Mistake 4: Lower back taking over in bridges
Fix: Posterior pelvic tilt at the top, squeeze glutes, don’t overextend.
Beginner-friendly modifications
If you’re new to band training, start here:
- Use 30 seconds on / 30 seconds off
- Do 1 round only (10 exercises once through)
- Choose a light band
- Keep everything slow and controlled
You’ll still get a great workout—and you’ll be far more likely to stay consistent.
How to progress (without needing heavier weights)
Progression is what creates results. Here are clean ways to level up:
- Increase total work: 2 rounds → 3 rounds
- Increase time under tension: 40/20 → 45/15
- Add pauses: 1–2 sec hold at peak contraction
- Slow eccentrics: 3 sec on the way back
- Heavier band: only when you can keep perfect form
- More range: gradual, controlled, no twisting
Weekly plan (simple and realistic)
For most people, 2–3 sessions/week is ideal.
Option A (2 days/week):
- Day 1: 30-min glute & outer thigh band workout
- Day 2: Full lower body (squat/hinge/lunge) + light band finisher
Option B (3 days/week):
- Mon: Band glute/outer thigh workout
- Wed: Upper body + walk
- Fri: Band glute/outer thigh workout
Optional: short glute activation (10 minutes) on Sunday
Tip: If your glutes are always sore, reduce volume. If you never feel challenged, increase tension/time or add a third day.
FAQ: Glute & outer thigh band training
Is this workout good for “hip dips”?
You can’t spot-reduce fat, but building the glute medius exercise and overall glute mass can improve the look of the side hip area over time.
How long until I see results?
With consistent training (2–3x/week), progressive overload, and decent nutrition, many people notice better shape/stability in 4–8 weeks.
Do bands really build muscle?
Yes—bands can build muscle when you train close enough to fatigue with good form and progressively increase challenge (time, tension, volume, or control).
Should I do this before or after heavy leg day?
Both can work:
- As a warm-up/activation (1 short round) before heavy lower body
- As a standalone workout on a different day
- As a burnout finisher after strength training
Conclusion: Your at-home blueprint for stronger glutes and outer thighs A mini band workout looks simple, but when you keep constant tension and move with control, it becomes one of the most effective ways to target the side glutes and hip abductors at home. Use the 30-minute plan above 2–3 times per week, track your progress (band strength, time intervals, control), and you’ll build stronger hips, better leg alignment, and more visible glute development over time.
If you want, tell me:
- your fitness level (beginner/intermediate),
- what band(s) you have,
- and how many days/week you can train,
…and I’ll tailor this into a full 4-week (or 8-week) progressive program with exact intervals and progression steps.
Pingback: Best Squat Exercises for Glutes: 7 Variations for Women